↓
 

majek.sh

Marek Wodziński's home page

majek.sh
  • About me
  • LCD88
    • About
    • Features
    • Hardware
    • History
    • How it works
    • Posts about lcd88
  • R/C
  • Electronics
Home - Page 2 << 1 2 3 4 … 8 9 >>

Post navigation

← Older posts
Newer posts →

Christmas tree lamps with Arduino and WS2811 leds :-)

majek.sh Posted on 2015/01/08 by majek2015/02/09

Somewhere at the beginning of November I discovered RGB LEDs with embedded controller: WS2812 and others. Idea was so cool for me that I had to own one to play with it 🙂
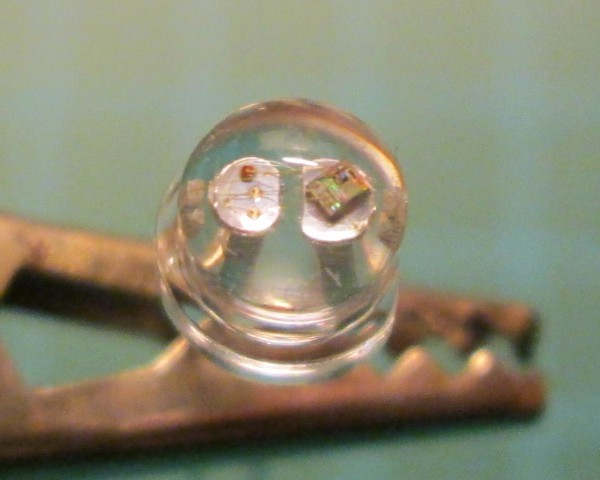
These chips became so common, that there are even put inside LEDs, like on this WS2812 diode:

WS2812 RGB LED

Considering time of the year, it was obvious to me to make whole string of lamps for Christmas tree. Then I found on Aliexpress ready made chains of such LEDs. 🙂
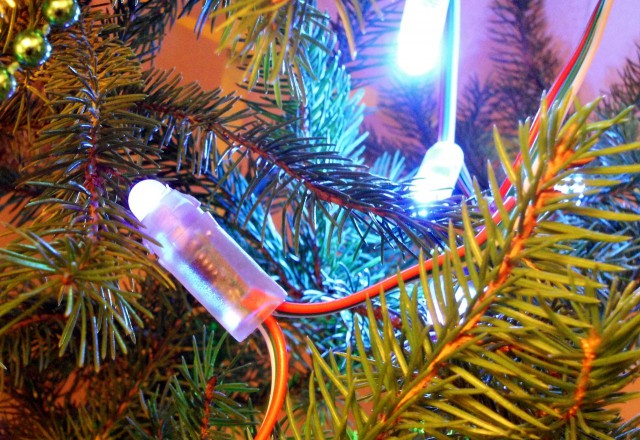
So, my LEDs aren’t with chips inside, but with small PCBs sealed with some kind of hard silicone – maybe not so elegant as chip integrated inside LED, but cheaper – which counts if you buy 50 of them :-):

WS2811 RGB LEDs on Christmas tree

Day before Christmas I still haven’t done anything with these light, so it was last chance to do something useful with it.

Connecting everything was quite easy as there are only 3 components: 5V power supply, Arduino Pro Mini board and LED chain.

Programming protocol for WS2811 was more challenging – generated waveform must be very accurate, with some time intervals taking only 8 cpu Atmega328 clocks (at 16MHz). So, I chose assembler to do it (as usual 🙂 ).
To be more hardcore, it was 3am when I started debugging 🙂 Honestly, without my new oscilloscope, finding these 3 mistakes I’ve made, could’ve took hours. Especially that Chinese guy who sells these LEDs described them as ‘we sent WS2811. Or we may sent UCS1903’ – two different possible chips (!) with two different protocols and no one knows which version I’ve got.
Luckily for me. it was WS2811, so first guess and code worked.

I added few simple routines to move light across whole chain of LEDs and put everything on Christmas tree.

All code for this ‘one night project’ you could find on my Github page: https://github.com/majekw/wsled

This is how it looks like on my Christmas tree:

Posted in Electronics | Tagged arduino, avr, diy, video | 3 Replies

Initrd in Slackware

majek.sh Posted on 2014/12/26 by majek2015/02/20

There is small simple howto with Slackware package mkinitrd, man page says a little bit more, more is kind of mystery 🙂
I switched from full kernel (in fact, my own compiled kernel) to initrd few years ago and since then I had learned a lot about it (sometimes in hard way) 🙂

So, this is my way (a little different than in man and readme) of doing initrd.

Installation

During Slackware installation you need to install:

  • kernel-generic (not kernel-huge!)
  • kernel-modules
  • mkinitd

and of course other packages you would like to have 🙂
Remember NOT to install kernel-huge package.

Install everything, setup lilo, timezones etc as usual. At the end DON’T reboot at the end of setup – system isn’t finished yet!

Now, it’s time to prepare new initrd.

  1. Chroot to /mnt (where new system should be already mounted)
  2. Make copy of default mkinitrd config:
    cp /etc/mkinitrd.conf.sample /etc/mkinitrd.conf
  3. Edit new /etc/mkinitrd.conf with your favourite editor and set few options:
    • uncomment and set MODULE_LIST and ROOTFS to type of your root filesystem, for example
      ROOTFS="ext3"
      MODULE_LIST="ext3"

      You don’t need to worry about all related modules, they will be added automatically.

    • if you use software raid, uncomment and set
      RAID="1"
    • if you use lvm or encryption, uncomment and set
      LVM="1"
    • I strongly recommend to set SOURCE_TREE and OUTPUT_IMAGE to some more unique names, for example
      SOURCE_TREE="/boot/initrd-tree-3.10.12"
      OUTPUT_IMAGE="/boot/initrd-3.10.12.gz"

      You don’t have to do this if you don’t want to play with custom kernels etc.

  4. make new initrd with mkinitrd -F
  5. add initrd image to lilo.conf adding it just after ‘image’ line, so it will look like this:
    image = /boot/vmlinuz-generic-3.10.12
     initrd = /boot/initrd-3.10.12.gz
  6. get out of chroot and rebuild lilo with:
    mount --bind /dev /mnt/dev
    mount --bind /proc /mnt/proc
    lilo -r /mnt

Right now you could reboot system and enjoy new Slackware with initrd:-)

What’s an advantage of this way instead of running mkinitrd with many bizarre options? See next part.

Normal usage

Sometimes you need to change kernel, upgrade or something like that.

There are 2 ways of maintaining Slackware with initrd:

  1. Use one initrd for all kernels
  2. Use separate initrd for every kernel or even every entry in lilo

One initrd for all

At start, make sure that you have commented out CLEAR_TREE or set it to 0 in mkinitrd.conf!

After installation of new kernel and running still from old one, you need to to set KERNEL_VERSION to version of your new kernel, for example

KERNEL_VERSION="3.17.4"

Then just run mkinitrd -F
That’s all about initrd – now image has required modules for both/all your kernels.
Of course you need new entry in lilo.conf for new kernel with exactly the same initrd as old one.
If you are making kernel upgrade (replace old kernel package) you don’t even need to touch lilo.conf. But in both cases, you must run lilo at the end.

From time to time, you could clean initrd tree from old modules from kernel you don’t use anymore. In this case just remove all directory with that modules from /boot/initrd-tree/lib/modules/old-kernel-version and regenerate initrd using as usual mkinitrd -F. And rerun lilo of course 🙂

Now, you probably see advantage of using mkinitrd.conf instead of remembering all those weird switches you used last time to generate this image.

Separate initrd for every kernel

This way have a little sense if you only use one root filesystem and only stock kernel which you sometimes only upgrade.

Separate initrd is even easier than ‘one for all’ attitude.
One drawback is that mkinitrd with -F flag only reads one default /etc/mkinitrd.conf file, so each time you have to copy saved configuration back to this file.
So, for first kernel you should customize at least SOURCE_TREE, OUTPUT_IMAGE and KERNEL_VERSION. Generate new initrd with mkinitrd -F, then make backup of mkinitrd.conf to for example mkinitrd.conf.3.10.17.
For next kernel with different options customize mkinitrd.conf again, create new initrd, make backup and so on.
That way you could have different initrds and saved all options to regenerate each of them. It’s safe attitude as playing with new kernel and initrd configuration you always have working old one.

Ok, that was easy part:-)
Next time I’ll cover how to combine initrd with encrypted root and even root on encrypted lvm 🙂

Update 2015.02.20

I found quite good article on the same topic at Slackware Documentation Project. So, it looks like i didn’t do so much research before writing this post 🙂

Posted in Linux | Tagged linux, slackware | Leave a reply

Picture thief

majek.sh Posted on 2014/12/14 by majek2014/12/14

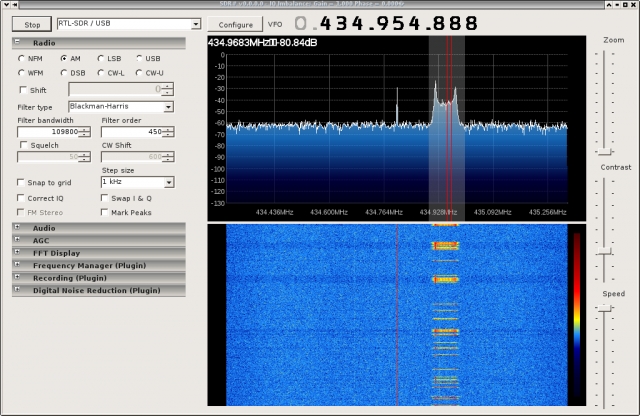
Recently I noticed in server’s logs that one of my blog pictures become very popular:
SDR# in action
It’s from this post: RTL2832U spectrum analyzer – part 2

Sometimes people embed my schematic or pictures on forums to enhance discussion. But this time one seller from Italy used my picture in his eBay offer. Moreover, he embedded my (and not only my) full resolution picture there, so he is also using my server bandwidth for free. Everything without a word.

There are many ways of dealing with that type of abuse, but I decided to use it as free promotion 🙂

I prepared new edited version of this picture (also smaller one):
sdrsharp-ebay

And set new rule in .htaccess to redirect all requests from eBay page to new file:

RewriteCond %{HTTP_REFERER} ebaydesc\.com/|ebay\.it/                                                                                                        
RewriteRule ^wp-content/uploads/2013/06/sdrsharp\.png /wp-content/uploads/2014/12/sdrsharp-ebay.jpg [R=302,L]

Now, his offer shows my new picture 🙂

Posted in Linux | Tagged linux | Leave a reply

Soldering AWG10 wire to XT60 connector

majek.sh Posted on 2014/08/16 by majek2014/12/14

If you need more flight time, more battery capacity helps (to some extent) 🙂
But most batteries are designed for very high current, wires and connectors are also choosen for this purpose.
It’s sometimes a problem. I use in my tricopter standard XT60 connectors as it’s amperage is good enought for this purpose. When I used 1800-2200mAh batteries it was ok, as there come also with XT60.

When I bought 4000mAh with HXT4mm connector, I also bought adapter from HXT to XT60 for it. Problem solved.

Soon 4000mAh was not enought for me 🙂
So, I bought 5000mAh, but this battery comes with 5.5mm bullet connectors. This time I decided to change connector to XT60 instead of messing with heavy adapters.
On Polish R/C forum there is a thread about such changes and most difficult thing for people is to solder XT60 to much thicker wires. My new 5Ah battery have 10AWG wire, so it’s quite thick. There are some ways for soldering these wires and I also have one.

Because ‘seeing is believing’ or ‘a picture is worth a thousand words’, I recorded how I solder such thick wire to XT60 🙂

What you need to make it:

  • tin ends of wire (mine were already tined as I desoldered old connectors instead of cutting it off)
  • turn pins in XT60 in opposite direction (you could use flat pilers to do it)
  • use ‘third hand’ – it’s very handy and also heat resistant
  • solder one wire at a time – it’s for your safety – don’t get a chance for short circuit
  • put tin into connector
  • put soldering iron into tin in connector and put wire there – this way area of heating is increased, so it’s easier and faster to do it
  • don’t hold wire in bare hands – use pilers, beacuse of heat
  • little patience depending on power of your soldering iron (mine have 65W) and experience

Good luck 🙂

Posted in Electronics, R/C | Tagged diy, small things, video | Leave a reply

LCD88 – going public :-)

majek.sh Posted on 2014/06/22 by majek2014/09/02

Last days I was learning how to use git instead of svn 🙂

I think it was worth to migrate LCD88 code from my personal repository to more public place, Github!
So, any further development will be there, I hope that it will be not only for downloading, but also you can contribute to project.
If you can’t code, there is also issue tracker, so you can request new feature, or simply report a bug. Starting forum threads is also planned 🙂

During repository move GPL license was also added, so feel free to use this code.

Repository url: https://github.com/majekw/lcd88

Another thing I’m making is separate part of my site dedicated only to LCD88. Someone could call it ‘documentation’ 🙂
Explore new menu item LCD88!

Posted in Electronics, R/C | Tagged lcd88 | Leave a reply

Post navigation

← Older posts
Newer posts →
  • English
  • Polski

Recent Posts

  • New 3D printer – vn-corexy
  • Classic keyboard for Lenovo X230
  • Changes, changes
  • Writing to internal FLASH on Arduino
  • dm-cache in Slackware
  • Christmas tree lamps with Arduino and WS2811 leds :-)
  • Initrd in Slackware
  • Picture thief
  • Soldering AWG10 wire to XT60 connector
  • LCD88 – going public :-)
  • XEBOOT – tiny Amega8 xmodem bootloader
  • RTL-SDR and ADS-B
  • Bluetooth dongle from China :-)
  • 2013 ended, 2014 is here
  • (Polski) Harpagan 46

Recent Comments

  • wefwe on End of Rex 6000 era
  • Kudłaty on Frequency meter up to 100MHz
  • majek on Frequency meter up to 100MHz
  • somok on Frequency meter up to 100MHz
  • majek on Frequency meter up to 100MHz
  • AM Technologies on Frequency meter up to 100MHz
  • majek on LCD88: R/C DIY transmitter
  • Sławek on LCD88: R/C DIY transmitter
  • Thiago Alves on End of Rex 6000 era
  • majek on Writing to internal FLASH on Arduino

Categories

  • 3D printing (1)
  • Electronics (22)
  • Life (12)
  • Linux (9)
  • R/C (20)

Archives

  • January 2021 (1)
  • April 2018 (1)
  • March 2018 (1)
  • June 2015 (1)
  • March 2015 (1)
  • January 2015 (1)
  • December 2014 (2)
  • August 2014 (1)
  • June 2014 (1)
  • May 2014 (1)
  • March 2014 (2)
  • February 2014 (1)
  • November 2013 (1)
  • August 2013 (1)
  • June 2013 (3)
  • April 2013 (1)
  • February 2013 (3)
  • January 2013 (2)
  • December 2012 (1)
  • October 2012 (1)
  • September 2012 (1)
  • August 2012 (9)
  • July 2012 (1)
  • June 2012 (2)
  • March 2007 (1)
  • March 2006 (1)
  • October 2005 (1)
  • February 2002 (1)

Tags

1-wire arduino avr awstats car china crash dialog diy dns e-osd e-wro fpv frsky fun g-osd gps głupota harpagan i2c lcd lcd88 linux logic analyzer multiwii netia osd ppm r/c repair rex.mamy.to rex6000 rtlsdr sigrok simonk slackware slovakia small things spectrum analyzer transmitter tricopter video video receiver watchdog xircom

Blogs

  • Blog Akuaku
  • Savage Chickens
  • xkcd

Friends

  • Belfer
  • Copernicus Project
  • freesco.pl
  • Harpagan
  • Sadziu
  • Tropiciel
  • Wydawnictwo Dobrew (audiobooki)
  • Wydawnictwo Muszkin

Hosting

  • mamy.to
©2021 - majek.sh - Weaver Xtreme Theme
↑