LCD88: Nadajnik R/C DIY
Jeszcze jeden? 🙂
Jest kilka otwartych projektów. więc po co następny?
Od początku: zacząłem ten projekt już w 2009, wtedy nie było zbyt wiele opcji dostępnych, gotowe nadajniki o sporych możliwościach były bardzo drogie. No i żaden nie był dostatecznie elastyczny jak dla mnie 🙂 Nawet dzisiaj nie wiem czy podobny nadajnik istnieje, przynajmniej za sensowną cenę, a nie tysiące $$ 🙂
BLOCZKI!
Cała unikalnośc tego projektu tkwi w BLOCZKACH!
Do sterowania każdym modelem mamy jakieś drążki, gałki, przełączniki, i na wyjściu kilka kanałów. Pomiędzy wejściami a wyjściami jest zawsze mniej lub bardziej elastyczna 'czarna skrzynka’.
W moim projekcie wnętrze 'czarnej skrzynki’ można swobodnie definiować łącząc dowolnie matematyczne bloczki.
Bloczki jakie można użyć:
- trymery
- rewersy
- dodawanie
- odejmowanie
- negacja
- expo
- mnożenie
- zamiana wartości analogowej na 3 stany: -1,0,1 (dla przełączników)
- powszechne mixery
- limity
- i wiele innych…
Najlepszą metodą na wyjaśnienie tego jak to wszystko działa jest pokazanie na przykładach.
W podanych przykładach powinieneś wiedzieć tylko, że kanały 0-7 są wejściami (drążki, potencjometry, przełączniki), natomiast 16-23 to kanały wyjściowe (to co dostanie odbiornik). Reszta czasem ma specjalne znaczenie, albo jest zarezerwowana, ale to nie jest tu ważne.
Prosty model – taki jak w większości prostych nadajników.
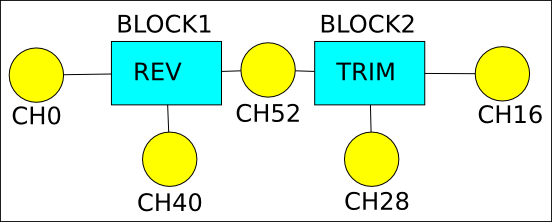
Kanał 0 (CH0) jest wejściem z drążka, jego wartoś idzie na wejście bloczka revers. Drugie wejście tego bloczka jest podłączone do kanału CH40, który pamięta pozycję przełącznika rewersu. Wyjście rewersu idzie do kanału 52. Następnym etapem jest bloczek trymera, który na jednym wejściu ma kanał 52 (wyjście poprzedniego bloczka), na drugim ma kanał 28 z którego dodaje wartość trymera. Wyjście bloczka trymera idzie już bezpośrednio do kanału wyjściowego.
Pozostałe kanały tworzy się w podobny sposób.
Bloczek specjalny rewers jest tak naprawdę bloczkiem mnożenia, ale w menu jest traktowany specjalnie – drugie wejście automatycznie pojawia się w menu 'Reverse’.
Podobnie jest z bloczkiem trymera, który jest bloczkiem dodawania, a drugie jego wejście pojawia się w menu 'Trims’.
Wygląda prosto, nieprawdaż? 🙂
To teraz coś odrobinę trudniejszego.
Delta lub latające skrzydło
Kolejny przykład: mixer delta.
Na początek warto napisać co taki mikser liczy:
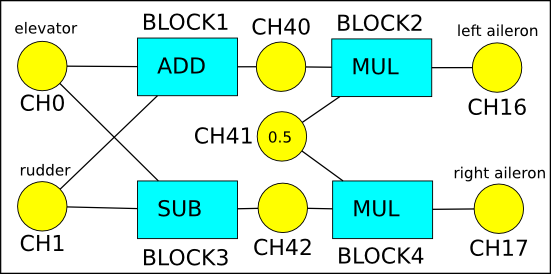
prawa lotka = ( - kierunek + wysokość ) /2
To narysujmy bloczki do policzenia tego:

Ale to tylko sam mixer, a co z trymerami, rewersami itp?
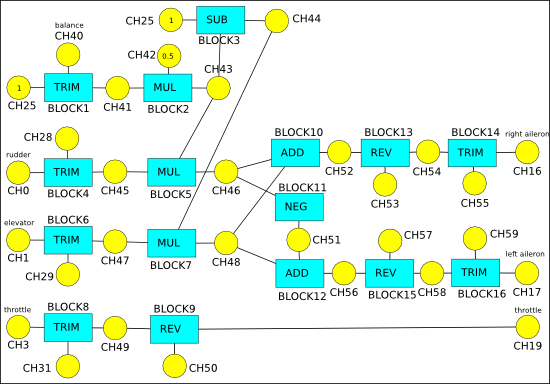
Spójrzmy więc na prawdziwy model:

Wygląda dosyć skomplikowanie, więc wyjaśnijmy o co tu chodzi.
Trochę zmodyfikowane równanie mixera delta:
lewa lotka=0.5*wysokość-0.5*kierunek
Myślę, że większość ludzi, którzy mieli okazję latać latającym skrzydłem może potwierdzić, że ten typ modelu jest bardzo wrażliwy na ster wysokości. Jednym z rozwiązań tego problemu jest ustawienie expo na kanale wysokości. Ale można też po prostu znieczulić wysokość na korzyść steru kierunku. Czyli zamiast używać 0.5 jako mnożnik dla obydwu kanałów, używam mniejszego dla wysokości, a większego dla kierunku. Ważne, żeby suma współczynników nie była większa od 1, to wtedy wartości na wyjściu nie będą przesterowane lub obcięte (podobnie zrobiłem w moim małym mikserze na ATTINY13).
Spójrzmy na powyższy obrazek. Bloki 1-3 'wytwarzają’ mnożniki dla mixera delta. Ponieważ CH40 jest podłączony do bloczka trymera, więc jest możliwość z poziomu menu na modyfikację tego mnożnika. Bloczek 2 normalizuje wartość, żeby mieściła się między 0 a 1, Bloczek 3 wytwarza drugi mnożnik odejmując od 1 poprzedni wyliczony.
Bloczki 5,7,10,11,12 tworzą mikser delta z zmiennymi mnożnikami. Po mikserze delta są bloczki rewersów i trymerów dla właściwego ustawienia kierunku i pozycji neutralnej serwa.
Blisko wejść mamy bloczki 4,6 i 8 – zwykłe trymery przydatne do korekcji zachowania samolotu w locie.
Czyli jeżeli można sobie wyobrazić równanie opisujące zachowanie aparatury, to można takie coś zrobić z bloczków.
Oczywiście będą potrzebne jeszcze specjalne bloczki (stany, przełączniki, pamięci itp), ale to można niewelkim kosztem dorobić, i pewnie dorobię jak czegoś będę potrzebował 🙂
Wystarczy o bloczkach, warto jeszcze opisać kilka innych rzeczy 🙂
Architektura oprogramowania
W nadajniku jest kilka typów procesów:
- krytyczny – generowanie sygnały PPM
- wysokiego priorytetu – pobieranie wartości z wejść, przeliczenie bloczków i przygotowanie wartości dla generatora PPM
- reszta – interfejs użytkownika (menu, wyświetlanie czegoś na LCD, trymowanie, opcje etc.)
Generowanie sygnału PPM
Użyłem sprzętowego generatora PWM, żeby PPM był jak najdokładniejszy jak to tylko możliwe 🙂
Udało się dzięki ustawieniu licznika w tryb CTC i modyfikacji go w przerwaniu, ale w niekrytycznym momencie. Cały pomysł opiera się na tym, że zmiana górnej wartości licznika w tym trybie odbywa się automatycznie dopiero po dojściu licznika do końca. Czyli nową wartość dla następnego cyklu można wpisać w dowolnym momencie trwania obecnego bez jego zaburzania. Daje to sporo czasu na przeprogramowanie licznika i nie skutkuje jitterem czy innymi dziwnymi rzeczami. Ponieważ cały kawałek przebiegu dla jednego kanały składa się z impulsu synchronizującego, a później z o wiele dłuższego zależnego od wartości zadanej, uruchamiam licznik zawsze ze stałą wartością dla czasu synchronizacji, a po jego zakończeniu już programuję licznik na nowy cykl. Ponieważ mam na to co najmniej 10000 cykli zegarowych, szansa, że nawet jakieś inne przerwanie opóźni przeprogramowanie jest właściwie zerowa.
A ponieważ przeprogramowywanie odbywa się w przerwaniach, więc niezależnie co robi główny wątek programu, to sygnał PPM jest zawsze generowany.
Odczytywanie wartości, przeliczanie i inne rzeczy
Kolejnym ciekawym rozwiązaniem jakie zastosowałem w tym oprogramowaniu jest multitasking (tak, na AVR:-) )
Ponieważ przerwania powinny być w miarę krótkie, natomiast proces przeliczania bloczków może trwać trochę dłużej, postanowiłem zrobić coś co pozwoli na ciągłe i prawidłowe działanie aparatury nawet jak dużo klikamy po menu czy wykonujemy inne czasochłonne operacje, które zabijają programy oparte na jednej pętli ze wszystkim.
Co się w takim razie naprawdę dzieje w tym sofcie?
Z powyższego widać, że w przerwaniach generowany jest sygnał PPM. Na przerwaniach również odczytywane są przetworniki ADC, przeliczane na zakres -1..1 i wstawiane w odpowiednie kanały. W przerwaniach jest również przeglądana klawiatura. Żadne z tych przerwań nie blokuje procesora na więcej niż kilkaset taktów.
Pozostają jeszcze dwie rzeczy: przeliczanie bloczków, które może zająć więcej czasu (więc nie powinno być robione w przerwaniach) oraz obsługa klawiatury i wyświetlanie informacji na wyświetlaczu (przerysowanie kolorowego wyświetlacza potrafi trwać nawet koło miliona taktów!). W tym wypadku postanowiłem, że wątek 'wyświetlacza’ jest głównym wątkiem i działa cały czas. Natomiast zaraz po tym jak zostaną zebrane nowe wartości z przetworników ADC wątek ten jest wywłaszczany i uruchamiane jest w jego miejsce przeliczanie bloczków. Gdy wszystkie bloczki zostają przeliczone, program wraca do poprzedniego wątku. W ten sposób wszystko robione jest o czasie, a klikanie po menu i wyświetlanie na ekranie nie ma żadnego negatywnego wpływu na działanie nadajnika.
Dodatkową zaletą multitaskingu jest to, że programując 'user interface’ nie muszę się martwić o czas wykonywania, czy dzielenie procedur na kilka części i uruchamianie ich po kawałku (jak to robiłem w GPS-ie).
Pamięć
Zdecydowałem się użyć wewnętrznej pamięci Flash (programu) jako miejsca na definicję modeli (bloczki, wartości kanałów itd). Dane są zapisywane 'kontenerami’ z odpowiednimi nagłówkami (numer modelu, typ bloczku itp), żeby można było szybko znaleźć w takim śmietniku odpowiedni bloczek. A ponieważ jest to pamięć flash o mniejszym życiu niż wbudowany, ale mały eeprom, więc jest jeszcze jedno dodadkowe założenie: każdy bloczek może wystąpić więcej niż jeden raz – w takim wypadku aktualnym jest ostatni. Pozwala to zmodyfikowane bloki po prostu zapisywać na końcu pamięci, a całość 'odśmiecać’ dopiero co jakiś czas na żądanie.
Z drugiej strony używanie trymerów mogło zapchać w ten sposób pamięć bardzo szybko, więc zdecydowałem, że jako tymczasowe miejsce do przechowywania będzie używany eeprom. Gdy już wszystko wytrymujemy jak trzeba, to można przenieść wartości kanałów z eepromu do flasha.
Właściwości nadajnika
- Pamięć modeli (maksimum 31).
- Każdy model składa się z:
- komentarzy (maksimum 256/model), nazwa modelu jest jednym z nich i jest obowiązkowy, komentarze mogą opisywać kanały jak i bloczki
- kanałów, niektóre są dedykowane jako wejście, niektóre jako wyjście, reszta moża być użyta jako miejsce na trymery, rewersy czy do połączeń pomiędzy bloczkami (maks. 253/model)
- bloczków, które robią całą przeliczeniową część 'czarnej skrzynki’ (maksimum 255/model)
- listy w jakiej bloczki powinny być przetwarzane, obecnie lista musi być ręcznie robiona, ale możliwe, że w przyszłości będzie generowana automatycznie
- 8 kanałów wyjściowych, można zwiększyć, ale należy pamiętać, że wtedy ramka już może się nie zmieścić w standardowym czasie i trzeba będzie coś zmienić
- 8 analogowych wejść z możliwością podłączenia pod nie przełączników
- wyjście PPM (super dokładne, wolne od jiteru, ok. 11000 kroków na kanał)
- wewnętrzne obliczenia robione na 16 bitowych liczbach stałoprzecinkowych (6+10), czyli z rozdzielczością ponad 2048 kroków
- bootloader po porcie szeregowym, czyli upgrade firmware może być zrobione zwykłym kablem usb-serial(ttl)
- kolowy wyświetlacz LCD
- 6 klawiszy do nawigacji po menu
- Open source! (kod wrzucę niedługo)
Troszkę historii
W 2006, kiedy zacząłem interesować się modelami R/C, kupiłem najtańszą 4 kanałową aparaturę z myślą, że jak będę potrzebował czegoś więcej, to na tej bazie zrobię sobie już sam:-)
Gdzieś pomiędzy 2007 a 2008 podczas dyskusji na forum Alexrc narodziła się idea super elastycznego nadajnika.
Pomysłem było, żeby to co jest w środku nadajnika dało się zdefiniować przy pomocy bloczków z podstawowymi funkcjami matematycznymi i połączeniami pomiędzy nimi, wejściami i wyjściami.
W 2008 zrobiłem sobie uniwersalną płytkę do wielu zastosowań na Atmega8L i z wyświetlaczem z telefonu Siemens S65.
W 2009 wymieniłem Atmega8L na Atmega88 – dzięki temu mogłem podnieść taktowanie procesora z 7MHz do ponad 11MHz nadal pozostając w zgodzie ze specyfikacją procesora i zasilając go z 3V. I tu prawdziwa historia się zaczyna 🙂
Pod koniec 2009 miałem już kilka rzeczy skończonych: generowanie ppm, przeliczanie bloczków, multitasking, podstawy interfejsu użytkownika (menu, klawiatura). I od tej pory projekt utknął na prawie 3 lata.
Chciałem zrobić wszystko zbyt uniwersalne i niestety to podejście nie sprawdziło się do intefejsu użytkownika. Podczas tych lat używałem kilku prostych nadajników, które do moich samolotów sprawdzały się całkiem nieźle. Ale nowy projekt Tricoptera zmienił wszystko, gdy nie byłem w stanie żadnym nadajnikiem uzbroić płytki sterującej, poza tym nagle zaszła potrzeba posiadania więcej niż 4 kanałów. W ten sposób stary projekt odżył.
Pod koniec 2012 usunąłem praktycznie cały 'superuniwersalny’ kod generujący menu, przemyślałem pewne rzeczy (trzymanie trymerów również w eepromie) i od tego czasu projekt poszedł naprzód.
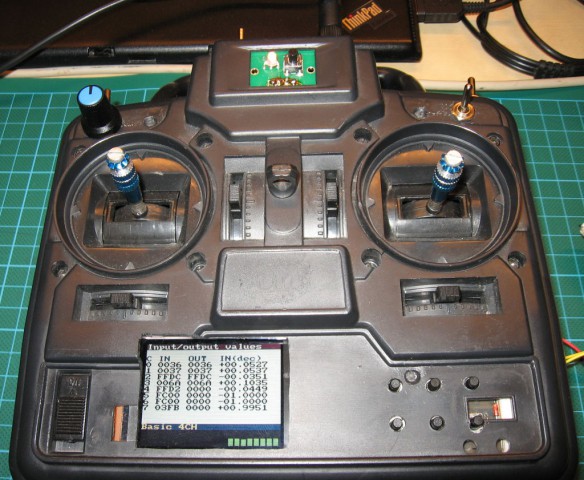
Płytkę wsadziłem do starego nadajnika, który kupiłem za 5zł, dodałem moduł FrSky DHT, podłączyłem razem do kupy i teraz można tego już używać w prawdziwym świecie 🙂
Przyszłość
- Zmiana procesora na Atmega168 lub od razu na Atmega328 (kod jest gotowy dla obydwóch – trzeba tylko porobić płytki i polutować)
- Ponieważ obecnie praktycznie nie jest możliwy już zakup wyświetlacza od S65 (mimo, że mam jeszcze zapas 🙂 ), to kupiłem już podobny i postaram się jego również obsługiwać.
- Przejrzenie i zmiana kodu, żeby można było go uruchomić na zwykłej płytce Arduino z procesorem Atmega328 (czyli dostosowanie do innej częstotliwości taktowania).
- Więcej kodu, więce funkcjonalności (niestety już nie na Atmega88, bo więcej tam się już nie zmieści w pamięci)
- Timery, extender i/o (możliwość podłączenia dodatkowych wejść, wejście trenera)
- …


Hello, nice transmitter 🙂 I especially like the awesome mixer-setup-interface.
I am making something similar using Mega168/328 with GCC ( not Arduino ). I have managed to get PPM input and output using CTC and 1 compare match from Timer1 only, it is completely interrupt driven and runs fine even at 20 MHz. I am about to start implementing my „black box” of mixers. Mostly this project was started due to the inability to use both Delta and Differential mixers on my Graupner MC12. The first version will be a small PCB that connects the output PPM ( student out ) to the input PPM ( student in ) on the same transmitter. This will give me the nice option to bypass my pcb with the student-switch and I can use my normal TX for testing, no need to build a complete transmitter ( yet ). When all the PPM-stuff is OK I might add sticks, knobs switches and some display but I`ll probably move to Cortex M3, I have some NXP-boards floating around.
Any chance of finding your sourcecode somewhere?
My code is managed in git, it´s not so pretty but I´ll be happy to share, perhaps you´ll find the timer1 ppm implementation interesting or useful.
Regards,
Kalars
1. I have my code in svn, but repository isn’t publicly available (yet). My code (warning: pure assembler 🙂 ): https://majek.sh/modele/lcd88-rev117.tgz
2. If I were starting this project today, I would choose definitely some ARM platform (probably STM32) and C as programming language 🙂
3. Keep in mind that interrupt can’t be executed always in exact time (some instructions last longer, some are shorter, some block cpu (eeprom access), sometimes you have to wait for another interrupt to complete). If you use PWM output and program counters before generation, it’s fine. But if you use counter to make interrupt and you toggle pwm output there, you get some delay (not constant) between cause of interrupt and result.
4. Idea of baypass is quite good:-) In my case I could replace all electronics because I have two other transmitters 🙂
5. Regarding 20MHz – it’s a lot of time to do many things:-) I encountered not enough 'power’ in only 2 cases: drawing on lcd screen (spi could run faster 😉 ) and video overlay generation (in OSD).
Anyway, it’s fun to make such things, but it also require patience and lot of effort to finish it – transmitter is quite complicated thing. In my case making ppm, tasks, 'black box’ was fun, but whole user interface is just a 'need to finish/work’.
Good luck wih your project!
Panie Marku czy Pana projekt był kiedyś przepisany na platformę Arduino?
To zależy:-)
Hardware, to dokładnie najmniejsze, najprostsze i najtańsze Arduino.
Co do software, to myślałem nad tym, ale:
– 'koszt’ przepisania tego byłby za duży
– musiałbym zrobić multitasking dla Arduino (niebanalna rzecz)
– baaardzo zmalałaby pamięć na modele, bo sam kod byłby większy, a obawiam się, że nawet mógłby się nie zmieścić w Atmega328. Wtedy całe założenie, że ma być tanio i dobrze nie będzie już spełnione.
Natomiast niedługo pojawi się inny bootloader (modyfikacja Optiboota), więc łatwiej będzie wgrywać nowy soft (używając avrdude zamiast tajemniczych komend z minicoma). Docelowo ma być również dostępny eksport/import modeli jak i ich modyfikacja w aparaturze, więc wtedy nie będzie potrzebna kompilacja przy każdej zmianie – wystarczy raz wgrać hex-a.
Witam
Na jakim etapie jest obecnie praca nad nadajnikiem? Od dłuższego czasu nie widzę nowych wpisów – czyżby projekt umarł?.. Zapowiadał się całkiem ciekawie, ale chyba nie ma szans na samodzielne wykonanie?..
Fakt, że utknęło to, ale jeszcze się nie poddaję 🙂
Co do używania, to obecnie da się tego używać o ile przemyśli się budowę mikserów w modelu.
Ich zmiana, to niestety nadal przeprogramowanie softu. Chociaż powinno był łatwiej, bo nie potrzeba dedykowanego bootloader-a, a może być zwykły Optiboot. Mając któreś Arduino na Atmega328, to nawet nie trzeba mieć programatora. Avrdude po serialu bez problemu wgra skompilowane oprogramowanie. Natomiast do Arduino trzeba konwerter poziomów, żeby podłączyć wyświetlacz, ale to też można już tanio kupić gotowe.
Natomiast w 'polu’ można zmieniać trymy, rewersy i same modele, więc nie ma problemu z normalnym użytkowaniem.
Obecna wersja softu dostępna jest na https://github.com/majekw/lcd88